Friday, March 13, 2009

So in honor of Miz Jess's birthday, I tried my hand at a full apron. I made little skirty aprons for a few of my girls for Christmas, but really, you don't get messy around the skirt-area when you cook so much as generally slopping things down your front. Maybe that's just me.
Previous post shows the sexy brown pillowcase. Who in the hell would ever think sheets like that were a good addition to a home? They're not even soft. But I digress.
I had to get kinda creative with the fabric distribution, because I was working with limited materials. I already had some plain muslin on hand to line it with, which I also used for the strings and neck strap.
A shot of how I pieced it together:
Instead of stenciling or applique'-ing a chicken, I found a cute hen pillow on etsy and decided to straight-up steal the idea. My twist, though: Hen Pocket! It's a Pocket. Shaped like a Hen.
Closeup of Hen all laid out:
Aren't you cute. The details were small sample bits included when I ordered some other fabric. I'm pleased at how well the colors go. I considered putting an egg on there somewhere, but I think it's fine without.
I'll skip the how-to, because there are lots of better apron patterns than the one I came up with on the fly out there on the internet, and cut right to the Finished Product, as modeled by the lovely Brahbrah (who is still Under Construction):


I'm pretty stoked on this, it is Hell of Cute. One note, though. The fabric came from the thrift store, and I didn't wash it before I started the project, because the laundromat was not in my plans until after I wanted to start on it. Ironing stuff straight from the thrift store produces a Seriously Disgusting Smell. It's like Thrift+. I'm going to wash it this afternoon before forking it over, but man. I think I've learned my lesson.
I have several projects going right now, in various stages of completion, thanks to a Killer Lunch Break at the Thrift Store.One of my Homegirls is an artist, and we've talked about making a trade: I'll sew her something nice, and she'll give me a piece of art. I would say that I come out on top, because I love to sew and then I get something sweet in return? But she doubtless enjoys painting as much as I enjoy sewing, so... everybody wins! Even better. The Rainbow Thing is a medium-weight cotton shower curtain, and I'm envisioning a 1970s-style summer top and sundress out of it. Maybe something off-the-shoulder, Mama's Family-style (what?).
The Green Thing is a killer linen tablecloth. I'd love to make a 1950s-style wiggle-dress with a boat neck and pencil skirt, like This Nice Lady did here, also out of a tablecloth. I kinda doubt I'll have enough fabric for that, so it might be just the pencil skirt. And that is Oh-Kay too.
The Brown Thing! It is an Old Pillowcase. I started deconstructing it before I remembered to take a picture, so the grody, stained off-white thing is part of it too. This is for milady Jess's birthday. It's going to be an apron, because she has recently taken a serious interest in cooking, and I'll always do my part to encourage mutual interest in Awesome Things. I thought the pattern on it looked an awful lot like chicken wire or chain link fence, so the plan was to make some sort of chicken decal or applique' to go on it. Very reminiscent of something I would've found in my grandmother's house.

Next post: The Chicken Apron.

Monday, January 05, 2009

So my folks had a wooden wine box they offered me a while back, and I took it with the intention of someday making something functional out of it. After six months of it sitting around on the floor, I got inspired Saturday morning to do something real with it. I'd planned on just going to the hardware store and buying turned legs to screw on, but I got lost and couldn't find a hardware store. I did, however, pass the thrift store on the way home, so I stopped in to see if there was a cheap piece of furniture in there that I could just saw the legs off of, keeping my contributions to the waste stream to a minimum. I found a perfect round side table, with long, very simply fastened legs that I didn't even have to saw off.


I'm giving the leftover tabletop and glass piece to my friend Tina, who is an artist and can doubtless make something wonderful out of them.


My next step is to successfully find a hardware store and buy some small hinges for the lid, so that it can be a functional storage piece as well as an auxiliary kitchen prep table.

This morning I discovered the 1000 Ideas for Creative Reuse contest at Extreme Craft:


It is a call for precisely what I made: some sort of refuse, creatively repurposed to fulfil some need, want, or desire. The contest wasn't just furniture, but "paper and book arts, jewelry, clothing, home and personal accessories, furniture, art, and miscellanea for possible publication" in a coffee table-type book There appeared to be at least 1500 entries when I uploaded mine. The competition's not too stiff, and if I'd known I was going to be doing it competitively before the last day to do submit, I probably would have put forth my best effort with the hinges and maybe some tung oil, as opposed to making it piece. Even if it doesn't win anything, I have now jumpstarted my decision to enter design competitions and push myself creatively.

Monday, October 20, 2008

Oh man, last part! The side pillows are probably the easiest, just because they're tiny. I deconstructed the old side pillow covers, to reuse the cording and zippers, and to use the pieces as a pattern for the new fabric. 2 zippers, 2 bits of cording, and the side panels for the pillows.


Covering the cording is pretty straightforward: wrap a 1.5" wide strip of cloth around the cording tightly (right-side-out for once), and stitch it up. I might be mistaken, but I think it's advised to use a special foot for sewing things like zippers and cording. Since my sewing machine is an awesome old 1970s hand-me-down from my former landlady, it doesn't have all the fancy attachments, so I just did it with a foot ordinaire, and it turned out fine:


Cut out two panels per pillow, slightly larger than the pillow itself:


Since there are no edge-panels for these, to accommodate for the pillow's shape, cut a 2-inch slit diagonally inward from each corner, and stitch it together like so:


Putting it all together with the cording is only slightly tricky. Same basic concept as all the others: pin it all together, inside-out and tightly. Working with the cording, you have to feel at it the whole time, to make sure the cord-part of the cording is lined up straight on the seam you're trying to sew. I'll try to illustrate it with a few pictures, maybe it will be more understandable:
If you look closely, you can see that the cording is facing the inside, sandwiched between the two side panels of fabric.


Being stitched up.


Below is the mostly-finished side pillow cover. To accommodate for the zippers on the bottom, hem the bottom edge of the panels:


The couch, in all its glory:


I'm pretty pleased. Notice the attempt at aligning all the patterns across the component pieces. There's only one really badly matched part: it's discontinuous across the left and right seat covers. I definitely had enough fabric to do it correctly, but I took leave of my senses when I was cutting it out.
Secret: it's still not finished-finished. I haven't added the zippers to the bottom of the side pillows yet, mostly because I hate sewing zippers and was in a hurry to finally have a finished-looking project. I'm also going to make the little arm-covers out of the leftover fabric, because the left arm gets a lot of sitting, and I would like to keep it as clean as possible. I probably won't bother posting the how-to for the arm covers, because it's pretty much the easiest thing (next to a handkerchief) you could make.

Friday, October 17, 2008

A quick note on supplies:
A good fabric store should have a reference on hand regarding amounts of fabric necessary. Bring in measurements and/or a photo of your furniture, and if there's anyone helpful working there, there shouldn't be much of a problem figuring it out. Mine, a smallish loveseat, required only 10 yards. Prints and geometric patterns generally take more, because you'll need to match the pattern on all the pieces.
As far as thread goes, go with something pretty heavy-duty (like a polyester) for the top, and then a lighter-weight thread to go through the bobbin, so it doesn't get jammed. It looks like I will be going through about 100 yards of thread total for this project (that is, 100 yards for the top and 100 yards for the bobbin). I could simplify and say 10 yards of thread for every yard of fabric you will be using, but I don't know if that's just a happy coincidence with my sofa or not.
Now for the part you sit on! Seat cushions are not hard to do, but they are time-consuming. One takes about 2 hours, although the other one will probably go more quickly.
The method is basically the same as with everything else: cut out the approximate sizes and pin them inside-out to the pillow you're covering. I used the same double-flap method for this, but made a mistake. I made the double-flapped opening much too short, and had to wrestle the pillow pretty forcefully into the case. Fortunately it is a pillow and not a person. The double-flapped (or zippered if you are ambitious) part should extend around the back corners at least 2 inches, to make for a larger opening and subsequent easier dressing of the couch.
Pictured below are the top and bottom panels, the two too-short hemmed pieces for the opening, and the one strip of cloth that goes all the way around. It's a little tricky getting the pieces sewn together around the double-curve at the piece that sticks out in front of the couch's arm, but not too difficult. It seemed easier to make it look good when I sewed with the long-strip side facing up, as opposed to the large pillow-shaped panel, if that makes sense.


The same technique applies to the cushions as did to the rest of the pieces: pin it inside-out, stitch it once, try it on, and double-stitch it. Below is the once-stitched piece:


And here is the reason why I like to check it after I've sewn once, instead of going ahead and double-stitching it without trying it on:


Oops. An easy fix, but I would've been pissed if I'd gotten it all double-stitched and on there for good, only to have to take it off and fix it so the border didn't show.

The whole pillow, off the couch:


That tricksy little corner, up close:


Here is the much-referenced hemmed opening in the back of the cover. You can use leftover and misaligned pieces for this part, because it will pretty much never be seen.


Oh man, this couch is so close now:


I've done an OK job with aligning the pattern from back pillow to seat pillow to front panel of seat pillow to front panel of base cover, considering it's my first slipcover evar. This is, however, a good opportunity for anyone else to learn from my mistakes and plan it out a little more carefully; it's certainly possible for the whole thing to align perfectly.

Tuesday, October 14, 2008

After a week of Ugly Sofa Time, I am finally in a position to start covering more pieces. Do not misunderstand, this takes a really long time. The base by itself took about six hours. A good way to break it up is a Sunday for the base, then one pillow a night after work until you're done. A week of transitional sofa is totally OK. Two weeks is borderline unacceptable, so I covered the two back pillows at the same time. While not as labor-intensive as the base, it still took longer than I thought: about 3 hours total.
The pillows are done in basically the same way as the base: take note of all of the separate panels on your existing pillow, and cut pieces out slightly larger than that. I really hate sewing zippers, so to get the covers on and off, I just made a double-flap at the bottom of the pillow where the zipper would be. Being that it's a double-flap, you cut out two pieces for the bottom.


Start out by hemming the bottom-double-flaps:


Then sew together all of the edge-pieces, bottom and sides. Lap the two hemmed bottom pieces over one another in a way that will make sense when it's a pillow cover. The picture probably illustrates that better:


The two hemmed parts are overlapping one another, facing in opposite directions.

Now do exactly like you did with the base of the couch: pin the whole thing together as tightly against the pillow as you can:


Then take it off through the bottom flap and sew it! Double-seams are a good idea here too.
It's worth pointing out that the original back cushions had two buttons on them. I contemplated doing that with the slipcovers too, but it would be really difficult to anchor them well enough to keep them from popping off. Feel free to try it yourself, if you're more ambitious than I.
It's... still an extraordinarily ugly couch, but it's on the way! At least it's more than 50% new upholstry.
I am in the process of slipcovering a seriously homely inherited loveseat, pictured below. After a cursory Google search, I found little more than "Throw a sheet over it and staple it down!" Which is unacceptable. My mom gave me general directions of how my grandmother used to do it, and it's shaping up to be perfectly acceptable, so I felt it appropriate to share with the whole of the internets how I am doing it.


Cover the couch base separately from the cushions, to avoid the slipcover pulling apart from the sofa every time you sit down. This uses a lot more fabric than just tossing it over and stapling around it. The upside is that it looks consistently presentable and is not obnoxious.
To get the fitt
ed base cover, measure and cut out slightly larger than the size of each fabric panel of the base upholstery. Then pin it all together tightly against the couch -- be careful not to pin the couch, because you're just going to have to take the whole thing off and sew it.
As far as the part that goes under the seat cushion goes, don't waste your nice upholstery fabric on it. I cut apart an old pillowcase, and it works pretty well.


Here's a closeup of the arm, all pinned up. The curves are pretty hard to sew, most of mine ended up looking janky.


After you're all pinned up, it's not a bad idea to take it off and put it on right-side-out, just to make sure your patterns line up and seams match.


Take it back off, turn it inside-out again, and sew. I actually drew on the exact line to sew, because I was really paranoid about screwing it up. It's not a bad idea, just make sure it's inside-out. Don't worry about the hem yet.
If you want, since couches get a fair amount of wear and tear, stitch the whole thing twice. You might as well, you're already sitting there with the sewing machine.
Once you're all sewn up and pins removed, put it back on the sofa inside-out. Trim up any extra fabric around the seams; it'll just make it bunchy and weird if you leave it.
Now for hemming, the easiest part. Flip it up, making sure that your pattern is even and that it stops just above the floor evenly all the way across. Pin it, take it off the couch for at least the third time, and hem it up. Be sure to iron it too, to get a nice crisp edge.


Because I am fastidious, I ironed the slipcover on the couch when I was done, so none of the fold marks from the fabric would show. This is not necessary if you are not crazy.

Ta-da!


The problem with taking on a sofa incrementally is that you are left with an uglier product than the original. Right now, this is pretty much the worst sofa that has ever existed.

Sunday, April 22, 2007

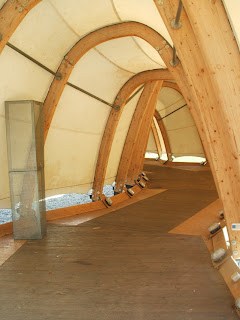
When I visited the Bauhaus, I passed this installation on the way from the train station:

It's called the "Expowurm," and if I had to guess, I would say it was for displaying projects. There was, unfortunately, no literature or people hanging around. It was some sort of membrane stretched over a wooden frame.

The interior could feasibly house temporary exhibits. Though the construction itself may well be a temporary exhibit. It's definitely not secure, because I wiggled up through one of the openings in the bottom to look around inside, because the doors (plain glass doors on each end) were locked.


Wednesday, April 18, 2007

I took a train from Berlin to Dessau on Friday 13 to visit the Bauhaus. The train ride was the most beautiful I've ever experienced, and I met a nice couple who spoke about 20 words of English between the two of them and offered me bananas and crackers (must've thought I had the stomach flu).
The Bauhaus is a very short walk from the train station (on Gropiusstrasse, appropriately), and I got and understood directions, leaving me feeling nothing short of world traveler extraordinaire. A fair amount of these are already up on my Flickr gallery, but some I will repeat because I like them that much.
Student dormitories.The dorms reflected in the buildings across the street.Everything, down to the light fixtures and door handles, was designed for the school.The building after WWII bombings.Gropius also designed houses for some of the professors, a few blocks down the road.A model of one of the houses, which were, I suppose, technically duplexes.
No kitchen cabinets -- I don't think Walter Gropius cooked much.